Friday, December 30, 2016

Test-fitting Coyote Engine

I have to say that this day has been long in the making. I honestly thought that I could do this in August but it's now December and a lot of my projects are still in process!  I'll finish them.


We started the day by flipping the intake.  First, the intake manifold was removed.  This engine will take some cleaning and will be getting a head rebuild.  


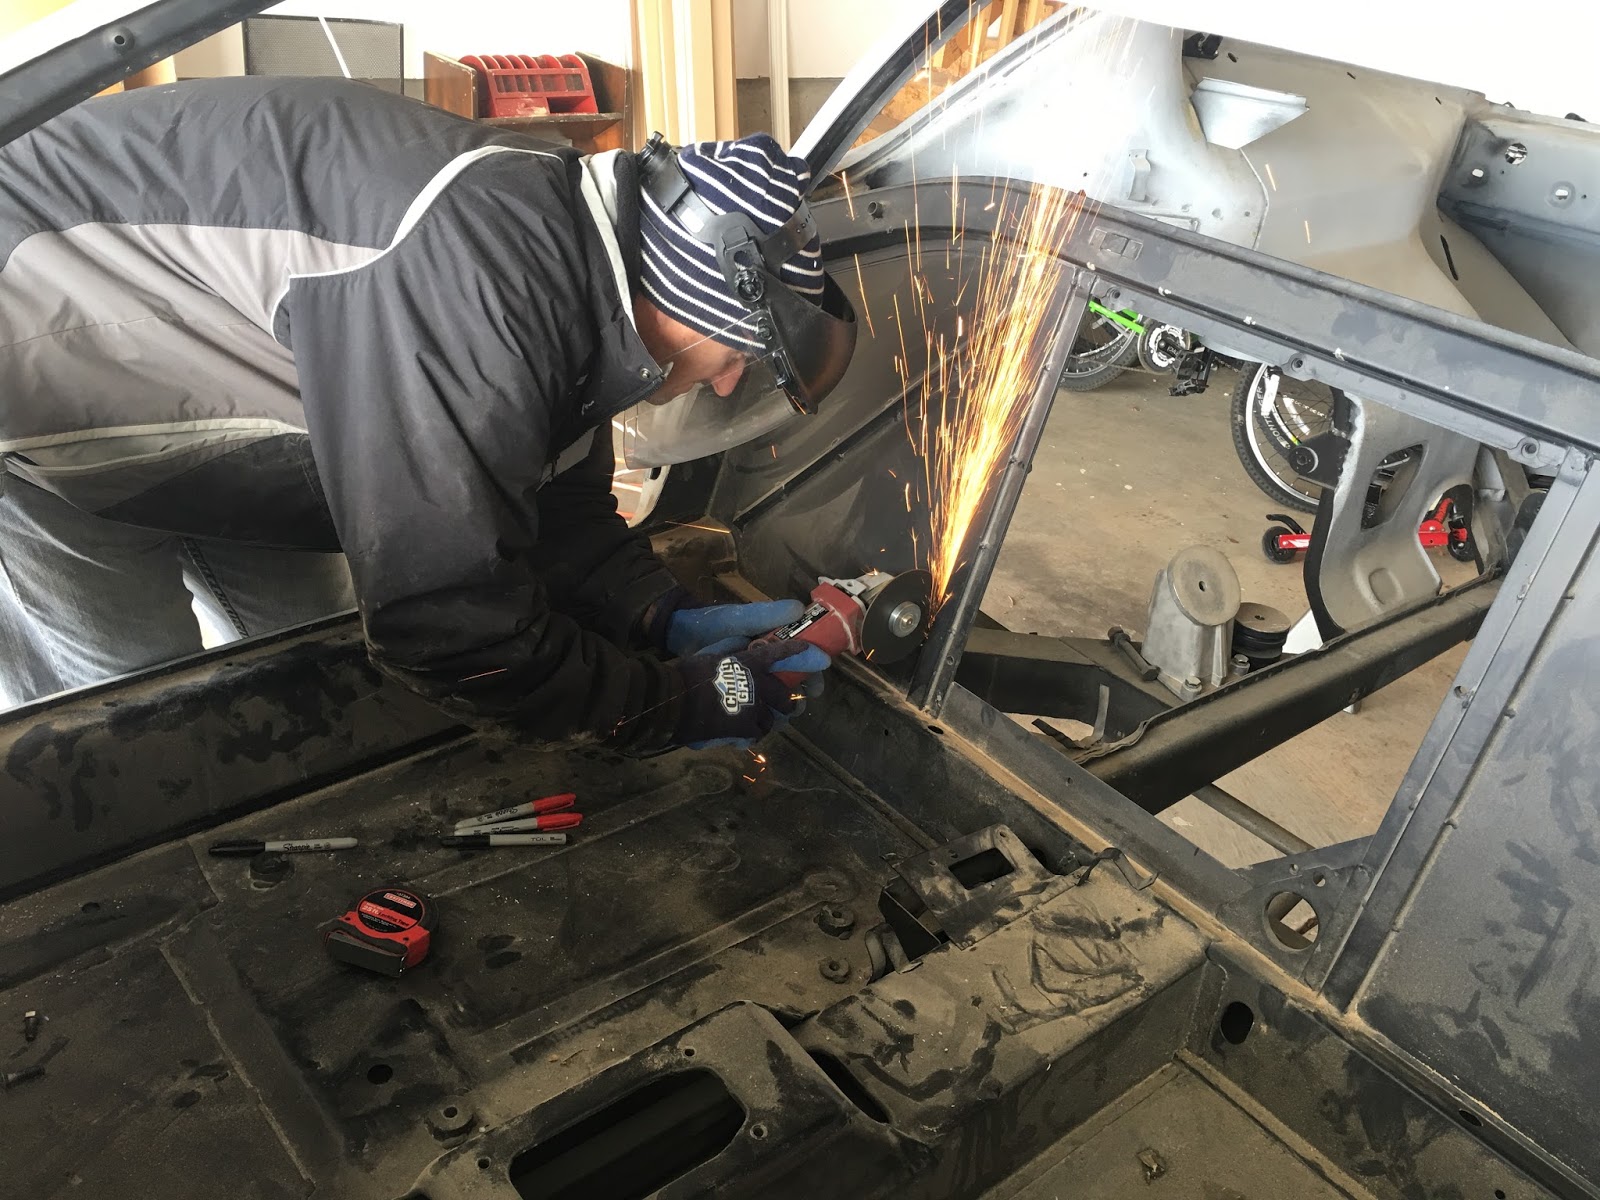
Next, fit was observed to be impeded in a few places.  There's a nub at the back that interferes with the front heater tube, which is easily cut.  There are two alignment pins that fit in the head that prevent flipping, again easy to remove.  Last, the back lip hits the water return neck and needs a slight trimming.  When reinstalling the intake, I'll be careful and come up with a way to align the intake on the heads to avoid a misalignment of the intake ports.


Here's the intake manifold, flipped.


I was able to install the upper motor mounts on the block but had to trim one to get it to fit instead of trimming the factory boss.  The side in this picture fit without any trimming.


We slung the engine with tie straps instead of chains; I couldn't find a good place to anchor the chains so we did this instead.  There's probably 350 lbs max on the front strap, which is well within its capacity.  However, the first attempt to put the motor in was met with disappointment.  The engine hoist isn't long enough and the motor was angled not far enough forward.  We started to get it in but had a hard time getting it back out to adjust the straps.  However, once we move the strap support point back, the engine tilted forward more and it was much easier.


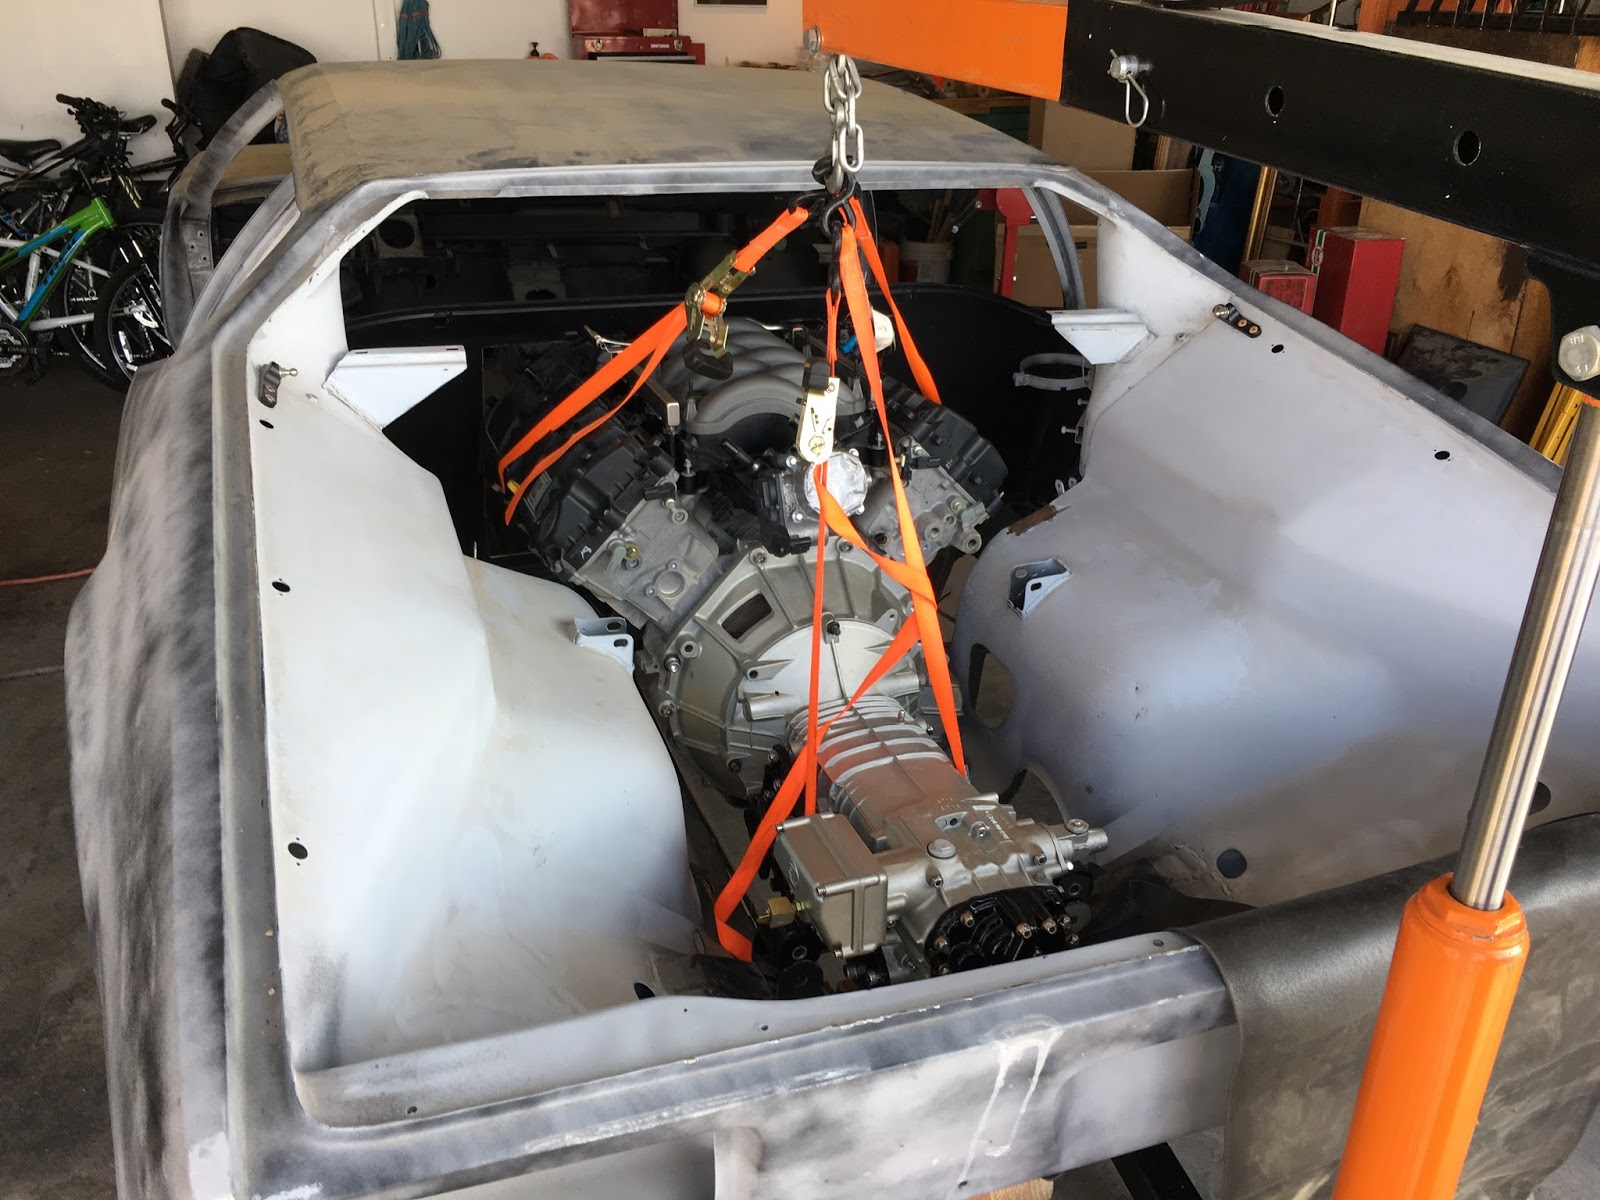
Although it looks like it's in, the engine is sitting on the mounts in the correct position but the rear transaxle mounts aren't sitting in their place.  This is because of clearance issues up front.  


I'm pretty happy in this picture.


Chris Hecht helped a lot and wanted his picture taken, too.


Too close here. There are several areas where further cutting will be required.


Thursday, December 29, 2016

Cutting Firewall

We moved the Pantera into the main garage and started cutting the firewall.  I was not really apprehensive about cutting the firewall as it isn't a stock piece.  However I am going to reinforce the opening eventually with steel tube.


Here's the firewall with no cuts yet.  Notice that the angles and sheet are NOT stock.  This is part of the reason I wasn't too worried about cutting my car to fit the engine.


Always measure first.  We had some reference photos from Pantera Performance Center that illustrated where to make the first cuts.


Here I am, cutting away.  I tried to keep out of the plane of an exploding cutoff wheel.


Now I'm cutting the driver's side.


Here's the finished cut opening.


Here's the first round of cuts at the passenger's side valve cover.


Tuesday, December 27, 2016

New Windshield, AC Grill

I bought a glue-in windshield from Panteras By Wilkinson the other day and it arrived today.  The box that it was shipped in was supposedly "$100" but it looks like it was $5 in cardboard.  I decided on a glue-in windshield since I'm missing three of the four pieces of surrounding stainless trim and I don't care for the rubber look.  The glue-in seems so much more modern.  I just wish it was a little easier on the wallet.  It is still easier on the wallet than buying a windshield, the correct gasket, and then all of the missing stainless pieces.  Such a course would be easily double the cost of the glue-in windshield.


The AC grill is straightforward and the price wasn't too high at $177.  I was shocked to see that you put in the lower or upper studs, fasten the studs, then bend the thing into shape!  It doesn't come pre-bent.  The good thing is it appears to be made of brass, which should be easily bent.


Saturday, December 24, 2016

Recaro Seats

I picked up a pair of Recaro seats; it wasn't easy to do due to a few complications. They fit the Pantera and they feel fantastic! I don't mind cloth; my daily driver has cloth seats. The cloth needs to be high quality cloth and these seem to have it. Dennis Quella modified these already for the Pantera.

I found them in Seattle for sale for a good deal.  Shipping would have made the deal be a lot more expensive.  However, my good friend Lynn does business in Seattle and travels there on a regular basis.  It turns out Lynn was headed to Seattle within a week or two of buying these.  In another complication, the seats were an hour north of where Lynn's business is, but Lynn sent a guy to pick them up for me!  What a guy!!!  Thanks Lynn!


Friday, December 23, 2016

Coyote Rebuild Parts

I bought some new Manley stainless steel valves for the Coyote.  Here's a comparison between the Coyote and a 4V 351 Cleveland:


Also bought Boss 302 springs and tensioners:


Not shown here is an aftermarket oil pump with billet gears, an oil filter relocation kit, various ARP fasteners, gaskets, a new front timing cover, etc.

Wednesday, December 21, 2016

Here We GO!

Yep, this holiday season will bring my car out of the garage!

I should be posting once every day or two.  Stay tuned...

Friday, May 20, 2016

Clean Engine

I cleaned the 5.0 the other day and it looks great now.  I also pulled the oil pan off to install the composite windage tray/oil pan gasket.  It looks like I have an engine with piston-cooling oil jets.


Thursday, April 7, 2016

Change of Plans

I've done it. Well, I'm on my way to building the car with a 5.0 liter Coyote engine instead of the 351 Cleveland. As much as I love the 351, the 5.0 Coyote is turning out to be cheaper yet produce similar power levels. The torque of the 5.0 Coyote, even at stock levels of 400 lbf-ft is sufficient for my needs in such a light car.

I found a good F150 candidate in need of valve repair for $1200:


It needs new intake valves due to the fact that over-idling this particular motor can burn them for some reason. It needs a harness and coils as well. If this engine has had intake valve problems, I'm not confident in my abilities to choose a salvage engine that would be better.  I have a good idea of where this one came from since the engine was a core destined to be returned to Ford from a dealer but saved by the mechanic who took it out. It has all of the sensors and also a Mustang intake, throttle body and injectors.

Why change direction?  I couldn't build a 351c for less than $12k with EFI, even doing most of the work.  They are just expensive prospects when you consider what is required.  The F150 Coyote, however, with a set of different camshafts, can make similar power for nearly HALF what the 351c would cost with EFI.  Even with a carburetor, the Coyote is less expensive and FAR more reliable at similar power levels.

The POCA President lamented a recent Pantera sale and stated that, in his opinion, putting anything but the 351c in the Pantera degraded the value of the car. He's not the guy who will be driving my car.  I'm driving it!  So while it may degrade the value slightly, it increases the car's value and drivability to me.

I've ordered and received Mustang GT intake camshafts, Boss 302 exhaust camshafts, a front timing cover, and a gasket set.  I've also purchased an oil pan and motor mounts from Dennis Quella specific to this engine swap.  I plan to purchase an engine sub-harness from Ford Racing as well as new Manley valves, Boss 302 valve springs, Boss 302 tensioners, a Ford Racing alternator kit, and Ford Racing replacement coils.  I also need the Ford Racing Controls Pack, complete with simplified harness, computer, O2 sensors, etc.  There will be some firewall modifications but nothing irreversible.  With a stock Mustang GT intake, the engine fits nicely below the engine screen and decklid.

Here's the Coyote/Pantera oil pan from Dennis Quella, probably built by Stef's Fabrication Specialties and re-badged: